Migrating a WordPress site can feel like defusing a bomb. One wrong move and you're staring at a white screen, broken links, or worse, a site that's been down for hours while your visitors get a "page not found" error. But here's the good news: if you're moving to Hostinger, you don't have to pay a dime for the migration itself, and you don't need to be a server admin to pull it off.
Hostinger includes free WordPress migration with every hosting plan as of 2026, and they've built a dedicated plugin that handles most of the heavy lifting. Whether you're running a simple blog or a content-heavy business site, there's a clear path to get everything moved without losing your SEO rankings, your email setup, or your mind. Let's walk through exactly how to do it.
Quick Answer
You can migrate your WordPress site to Hostinger for free using Hostinger's WordPress Migrator plugin. Install the plugin on your current site, enter your Hostinger migration token, and let it transfer your files and database automatically. For larger sites or plugin-free setups, the free version of All-in-One WP Migration works as a manual alternative.
After migration, update your DNS nameservers to point your domain to Hostinger and verify everything works before canceling your old host.
Why Migrate Your WordPress Site to Hostinger for Free
If you're still on a host that charges you $15 a month for sluggish load times and support that takes days to respond, you're overpaying. Hostinger's WordPress plans start at roughly $2.99 per month and include features that used to be reserved for premium hosting: LiteSpeed web servers, built-in caching, free SSL, and a custom control panel (hPanel) that's actually easy to use.
But the real draw for most people is the price-to-performance ratio. Hostinger runs LiteSpeed servers with LSCache, which can cut your time to first byte by 30 to 50 percent compared to a standard Apache setup. That's a measurable server-level difference that affects how fast your pages load and how Google ranks them.
Here's what you get on the entry-level WordPress plan:
| Feature | Hostinger Single WordPress | Hostinger Premium WordPress |
|---|---|---|
| Websites allowed | 1 | 100 |
| SSD storage | 50 GB | 100 GB |
| Monthly visits (approx.) | 10,000 | 25,000 |
| Free domain | No | Yes (first year) |
| Free SSL | Yes | Yes |
| Email accounts | 1 | Unlimited |
| Weekly backups | Yes | Yes |
| Staging tool | No | No |
| Starting price (renews higher) | ~$2.99/mo | ~$3.99/mo |
The free migration offer applies across all these plans. You're not locked into a specific tier to get it. That said, if you're running a WooCommerce store or a site with more than 50 GB of data, you'll want to look at the Business or Cloud plans for the extra resources and staging environment.
The migration itself doesn't cost extra regardless of which plan you pick. Hostinger's support team will even handle the migration for you on request, though the self-service plugin method is faster and gives you more control over the timing.
What You Need Before You Start
Jumping into a migration without prep is the number one reason things go sideways. Before you touch anything, take 20 minutes to get these items in order.
Back up your entire site. This is non-negotiable. Use a plugin like UpdraftPlus or your host's built-in backup tool to create a full backup of both your files and your database. Download that backup to your local machine.
If anything goes wrong during migration, this is your safety net.
Audit your site's size. Log into your current hosting control panel and check how much disk space your WordPress installation is using. Look at the wp-content folder specifically. That's where your uploads, themes, and plugins live.
If you're over 2 GB, you'll want to know that upfront because some free migration tools have file size limits.
Document your current setup. Write down or screenshot the following:
- Your current PHP version (found in your host's control panel or via a plugin like WP Server Info)
- Active plugins list
- Current permalink structure (Settings > Permalinks in WordPress)
- Any custom
.htaccessrules you've added - Email configuration (MX records, webmail settings)
Check your domain registrar. Know where your domain is registered (GoDaddy, Namecheap, Cloudflare, etc.) and make sure you can log in to update nameservers or DNS records. You'll need access to this after the migration.
Pick your Hostinger plan and sign up. You'll need an active Hostinger account before you can migrate. If you're looking to shave a bit off the already low price, check for current Hostinger coupon codes before checkout.
Once you've got those five things handled, you're ready to migrate. No surprises, no mid-migration panic.
The Two Free Migration Methods: Which One Fits Your Site
Not every WordPress site is the same, and the best migration method depends on your site's size, complexity, and how comfortable you are with technical tools. There are two solid free paths.
Method 1: Hostinger WordPress Migrator Plugin (Recommended for Most Users)
This is Hostinger's own plugin, and it's the easiest route for the majority of sites. You install it on your current WordPress site, enter a migration token from your Hostinger account, and the plugin pushes everything (files, database, themes, plugins, uploads) directly to your new Hostinger server.
Best for:
- Sites under 10 GB
- Users who want a guided, mostly hands-off process
- Standard WordPress installations (blogs, business sites, portfolios)
- Anyone who doesn't want to manually handle database exports
Limitations:
- Requires you to have an active Hostinger account first
- May struggle with extremely large databases (5 GB+) depending on server timeout settings
- Won't migrate email accounts or DNS settings (you handle those separately)
Method 2: All-in-One WP Migration (Free Version)
This is a third-party plugin that lets you export your entire WordPress site as a single file, then import it into a fresh WordPress installation on Hostinger. It's a bit more manual, but it gives you a portable backup file you can store locally.
Best for:
- Sites where you want a local backup regardless of migration
- Situations where the Hostinger plugin isn't compatible with your current setup
- Users comfortable with a slightly more hands-on process
Limitations:
- The free version has a 512 MB export file limit
- Requires you to install a fresh WordPress on Hostinger first, then import
- Large sites will hit the file cap unless you use workarounds like excluding certain folders
How to Decide
Here's a simple decision framework:
- Site under 512 MB and you want the simplest path? Use the Hostinger WordPress Migrator plugin.
- Site between 512 MB and 2 GB? The Hostinger plugin is still your best bet. It doesn't have the same file size cap.
- Site over 2 GB? The Hostinger plugin should still work, but contact Hostinger support first. They can often handle large migrations on their end.
- You want a local backup file no matter what? Use All-in-One WP Migration alongside the Hostinger plugin. There's no rule against using both.
For most people reading this, the Hostinger WordPress Migrator plugin is the way to go. It's purpose-built for this exact task, and it removes the majority of the manual steps that cause problems.
How to Migrate Using Hostinger's WordPress Migrator Plugin
This is the step-by-step process for the plugin method. Set aside 30 to 60 minutes depending on your site size. The actual transfer might take longer for large sites, but your involvement is mostly front-loaded.
Step 1: Get Your Migration Token from Hostinger
Log into your Hostinger hPanel. Navigate to Websites > Migrate Website. You'll see an option to generate a migration token.
Copy that token. You'll paste it into the plugin on your current site in the next step.
If you don't see the migration option, make sure you've already added your domain to Hostinger (even if DNS hasn't been pointed yet). You can add a domain under Websites > Add Website in hPanel.
Step 2: Install the Plugin on Your Current WordPress Site
On your existing WordPress site (the one you're migrating from), go to Plugins > Add New. Search for "Hostinger Migrator." Install and activate the official Hostinger plugin.
Step 3: Enter the Migration Token and Start
After activating the plugin, you'll see a migration screen in your WordPress admin. Paste the token you copied from Hostinger. Click Start Migration.
The plugin will begin packaging your files and database. You'll see a progress bar. Don't close the browser tab during this process.
For a typical blog or small business site (under 1 GB), this usually takes 5 to 15 minutes.
Step 4: Wait for Confirmation
Once the migration completes, the plugin will display a confirmation message. Hostinger will also typically send you an email. Your site is now on Hostinger's server, but it's not live to the public yet.
That's because your domain is still pointing to your old host.
Step 5: Verify on the Temporary URL
Hostinger provides a temporary URL to preview your migrated site before you switch DNS. In hPanel, go to your website's dashboard and look for the temporary URL (it usually looks something like http://yourdomain.hostinger-test.com or similar).
Click through your site. Check the homepage, a few inner pages, your blog posts, and any forms or interactive elements. If something looks broken, don't panic.
Common post-migration issues are usually quick fixes, and we'll cover those in the troubleshooting section.
How to Migrate Manually Using All-in-One WP Migration (Free)
If the Hostinger plugin isn't an option for your situation, or you just prefer having a local backup file, this method works well. It takes a few more steps, but it's still free and straightforward.
Step 1: Install All-in-One WP Migration on Your Current Site
On your existing WordPress site, go to Plugins > Add New. Search for "All-in-One WP Migration." Install and activate the free version by ServMask.
Step 2: Export Your Site
Go to All-in-One WP Migration > Export. Click Export To > File. The plugin will package your entire site (database, media, themes, plugins) into a single .wpress file.
This is where the 512 MB limit comes in. If your site is larger, the plugin will warn you. For sites over the limit, you have a few options:
- Exclude your
uploadsfolder from the export and transfer it separately via FTP - Use the "Find and Replace" feature to reduce database bloat before exporting
- Contact Hostinger support and ask them to handle the migration manually
Step 3: Install Fresh WordPress on Hostinger
Log into your Hostinger hPanel. If you haven't already, install WordPress on your domain. Hostinger has a one-click installer under Websites > Auto Installer.
Use the default settings. You're going to overwrite this fresh installation with your exported site.
Step 4: Install All-in-One WP Migration on the New Site
On your fresh WordPress installation at Hostinger, install the same plugin. Go to All-in-One WP Migration > Import. Upload the .wpress file you exported earlier.
The plugin will overwrite the fresh WordPress installation with your actual site data. This may take a while for larger files. Don't close the tab.
Step 5: Save Permalinks
After the import finishes, go to Settings > Permalinks in your WordPress admin. Don't change anything. Just click Save Changes.
This flushes the rewrite rules and fixes most "404 not found" issues that appear after migration.
Step 6: Verify and Test
Browse your site using the temporary URL or by editing your local hosts file to preview the site on Hostinger's server before switching DNS. Check pages, images, links, and forms.
What to Do Immediately After Migration
Your site is on Hostinger's server. Great. But you're not done yet.
These post-migration steps are where most people drop the ball, and skipping them is what leads to broken sites and lost traffic.
Flush All Caches
If you're running a caching plugin (WP Super Cache, W3 Total Cache, LiteSpeed Cache), clear the cache immediately. Hostinger's server-level LSCache may also need purging. You can do this from hPanel under WordPress > Cache Manager if you're on a LiteSpeed plan.
Force SSL
Hostinger provides free Let's Encrypt SSL certificates. In hPanel, go to SSL > Install SSL and activate it for your domain. Then, in WordPress, go to Settings > General and make sure both the WordPress Address and Site Address use https:// instead of http://.
Install the "Really Simple SSL" plugin if you want an easy way to handle the HTTP to HTTPS redirect and fix mixed content warnings.
Test Your Forms and Functionality
Submit a test entry through every form on your site (contact forms, newsletter signups, checkout forms if you're running WooCommerce). Check that emails are being sent and received. A surprising number of migrations break form notifications because the SMTP settings don't carry over.
Check for Broken Images or Links
Use a free plugin like "Broken Link Checker" to scan your site. If you see broken images, it's usually because the file paths in the database still reference your old host's URL. A search-and-replace plugin like "Better Search Replace" can fix this.
Search for your old URL and replace it with your new one.
Update Your Search Console
Log into Google Search Console and add the new property if needed. Submit an updated sitemap (your sitemap URL is usually yoursite.com/sitemap.xml or generated by an SEO plugin like Yoast or Rank Math). This tells Google to re-crawl your site at its new location.
DNS, Domain, and Email: Getting Everything Pointing to Hostinger
This is the step that actually makes your site live on Hostinger. Until you update your DNS, your visitors are still seeing your old host.
Update Your Nameservers
Log into your domain registrar (where you bought your domain). Find the nameserver settings and replace the current ones with Hostinger's:
ns1.dns-parking.comns2.dns-parking.com
Or, if Hostinger provided custom nameservers in your hPanel welcome email, use those instead. The correct nameservers are always listed in your Hostinger account under Domains > DNS/Nameservers.
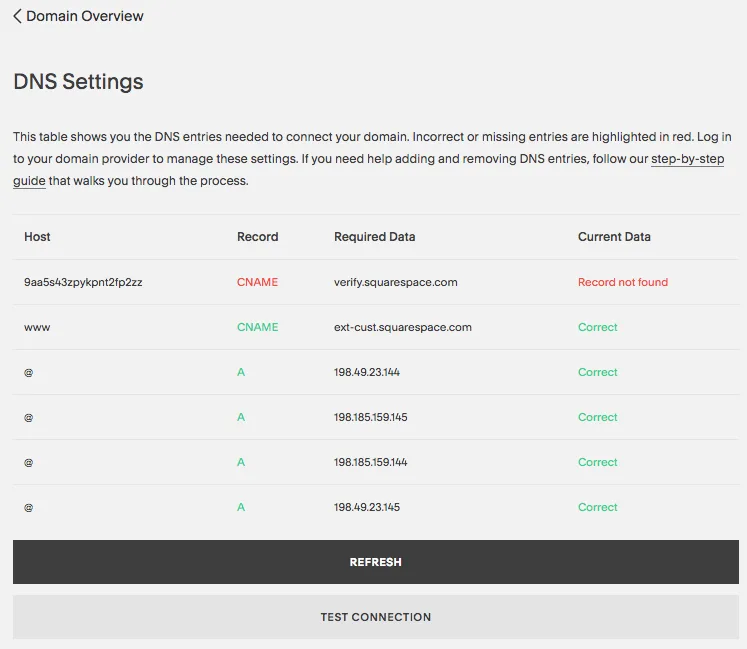
Understand DNS Propagation
After you change nameservers, it takes time for the update to spread across the internet. This is called DNS propagation, and it can take anywhere from 4 to 48 hours. During this window, some visitors will see your old site and some will see the new one.
This is normal.
You can check propagation status using a free tool like whatsmydns.net. Enter your domain and select "NS" (nameserver) to see which locations have updated.
Don't Cancel Your Old Hosting Yet
Keep your old hosting account active for at least 72 hours after the DNS switch. If something goes wrong, you can always point your domain back. Once you're confident everything is working on Hostinger, then cancel.
Reconfigure Your Email
If your email was hosted on your old provider (e.g., you were using your old host's webmail), you'll need to set it up again on Hostinger. In hPanel, go to Email > Create Email Account and recreate your email addresses.
Update your MX records in Hostinger's DNS settings to point to Hostinger's mail servers. The correct MX record values are in Hostinger's knowledge base. If you're using a third-party email service like Google Workspace or Zoho Mail, update the MX records to point to those providers instead.
Common Migration Mistakes That Break Sites
After walking through hundreds of migration scenarios, these are the errors that come up again and again. Avoid them and you'll save yourself hours of frustration.
Skipping the backup. If you didn't back up your site before starting, you're gambling. A failed migration without a backup means starting from scratch. Always, always back up first.
Migrating during peak traffic. Schedule your migration for a low-traffic window. If you're running an online store, don't migrate on a Friday afternoon. Late night or early morning on a weekday is usually safest.
Forgetting about serialized data. WordPress stores some data (like widget settings and theme options) in a serialized format. If you do a simple search-and-replace on the database without handling serialization, you'll break those settings. Use a tool like "Better Search Replace" which handles serialization, or WP-CLI's search-replace command with the --dry-run flag first.
Not updating the wp-config.php file. If you're doing a manual migration, the database credentials in wp-config.php need to match Hostinger's database settings. You'll find the correct database name, username, password, and host in hPanel under Databases > MySQL Databases.
Ignoring PHP version mismatches. Hostinger runs PHP 8.x by default. If your old site was on PHP 7.4, some plugins may throw errors. Check your error logs in hPanel under Logs > Error Log and update any incompatible plugins.
Changing DNS before verifying the site. If you switch nameservers before confirming the migrated site works on the temporary URL, you'll have downtime with no way to quickly roll back. Verify first. Switch DNS second.
Troubleshooting: When Things Go Wrong
Even with perfect preparation, migrations can throw curveballs. Here's how to handle the most common post-migration issues.
White Screen of Death
If your site shows a blank white page, it's usually a PHP error or a plugin conflict. Rename your plugins folder via FTP (to plugins-old) to disable all plugins at once. If the site loads, rename the folder back and reactivate plugins one by one to find the culprit.
You can also enable WordPress debugging by adding this line to wp-config.php:
define('WP_DEBUG', true);
This will display the actual error message instead of a blank screen.
500 Internal Server Error
This often comes down to a corrupted .htaccess file. Rename .htaccess to .htaccess-old via FTP and try loading your site. If it works, go to Settings > Permalinks in WordPress to regenerate a clean .htaccess file.
Permalinks Returning 404 Errors
Go to Settings > Permalinks and click Save Changes without modifying anything. This regenerates the rewrite rules. If that doesn't work, check that the mod_rewrite module is enabled on Hostinger's server (it should be by default on LiteSpeed plans).
Mixed Content Warnings
Your site loads but the browser shows a padlock with a warning. This means some resources (images, scripts, stylesheets) are still being loaded over HTTP. The "Really Simple SSL" plugin handles most of these automatically.
For stubborn cases, use "Better Search Replace" to swap http://yourdomain.com for https://yourdomain.com in the database.
Database Connection Error
WordPress can't connect to the database. Double-check the database name, username, password, and host in wp-config.php. In Hostinger, the database host is usually localhost, but confirm in hPanel under Databases.
Site Loads but Looks Broken (Missing CSS/JS)
This is typically a caching or URL issue. Clear all caches (plugin, browser, server). If the problem persists, check that the siteurl and home values in the wp_options table of your database are set to the correct URL.
Hostinger WordPress Plans Compared: Which One Should You Pick
Not every Hostinger plan is right for every site. Here's a breakdown to help you choose based on what you're actually running.
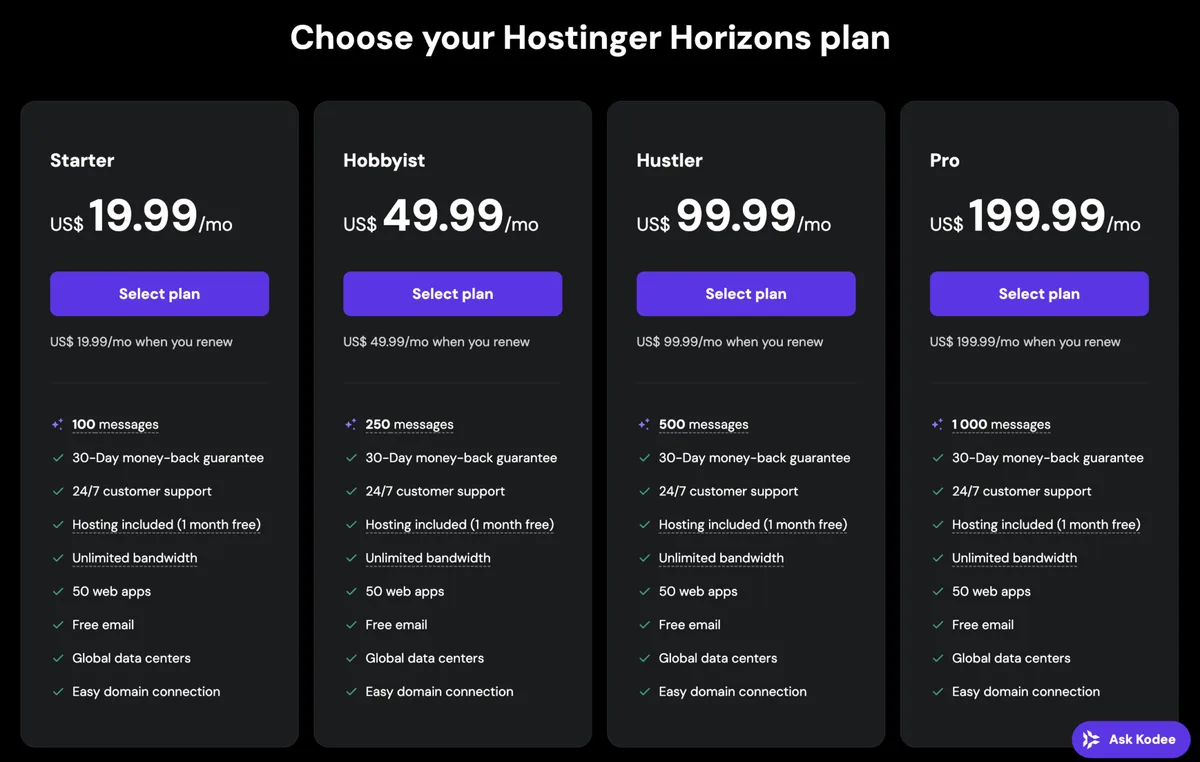
| Plan | Best For | Storage | Websites | Key Extras | Price (intro) |
|---|---|---|---|---|---|
| Single WordPress | Personal blogs, simple portfolios | 50 GB SSD | 1 | Free SSL, 1 email account | ~$2.99/mo |
| Premium WordPress | Growing blogs, small business sites | 100 GB SSD | 100 | Free domain, unlimited email, weekly backups | ~$3.99/mo |
| Business WordPress | High-traffic sites, WooCommerce | 200 GB SSD | 100 | Staging tool, daily backups, LSCache | ~$4.99/mo |
| Cloud Startup | Resource-heavy sites, agencies | 200 GB SSD | 300 | Dedicated IP, priority support, highest performance | ~$9.99/mo |
Go with Single if you have one small site and you're just starting out. It's the cheapest entry point and includes everything you need for a basic WordPress site.
Go with Premium if you manage multiple sites or want a free domain included. The jump from Single to Premium is only about a dollar, and the extra storage and unlimited email accounts are worth it.
Go with Business if you're running an online store, getting serious traffic (approaching 100K visits a month), or you want a staging environment to test changes before pushing them live. The staging tool alone is worth the price difference for anyone making regular site updates.
Go with Cloud if you're an agency managing client sites, or your current shared hosting is buckling under resource limits. You get dedicated resources, which means your site's performance isn't affected by other users on the same server.
All plans include the free migration, so you're not paying extra for the move regardless of which tier you choose.
Expert Tips for a Zero-Downtime Migration
A true zero-downtime migration is achievable if you're methodical about it. Here's how the pros do it.
Lower your DNS TTL before the switch. TTL (Time to Live) controls how long DNS records are cached. If your TTL is set to 24 hours, it'll take a full day for the new nameservers to propagate everywhere. Lower it to 300 seconds (5 minutes) at least 24 hours before you plan to migrate.
This makes the final switch nearly instant.
Use a maintenance mode plugin during the switch. Activate a maintenance mode plugin on your old site right before you update DNS. This prevents visitors from placing orders or submitting forms on the old server while propagation is in progress.
Keep both hosts running in parallel. Don't cancel your old hosting until at least 72 hours after the DNS switch. Some ISPs are slow to update their DNS cache. Having the old host active as a fallback means no visitor sees a broken site.
Test with your local hosts file. Before changing DNS publicly, you can test the migrated site on Hostinger by editing your computer's hosts file to point your domain to Hostinger's server IP. This lets you verify everything works without affecting any other visitors. Instructions for editing the hosts file are in Hostinger's knowledge base.
Monitor your error logs for 48 hours. After the migration, check Hostinger's error logs (hPanel > Logs > Error Log) at least twice a day for the first two days. Catch issues before your visitors report them.
Set up 301 redirects if your URL structure changed. If you changed your permalink structure or renamed any pages during the migration, set up 301 redirects to preserve your SEO rankings. The "Redirection" plugin handles this without touching .htaccess manually.
When to Contact Hostinger Support Instead of Doing It Yourself
There are situations where the free plugin route or a manual migration just isn't the right call. If any of these apply to you, skip the DIY approach and open a chat with Hostinger's support team first.
Your site is over 5 GB with a large database. Plugin-based migrations can time out on huge databases, and you'll spend more time troubleshooting than it would take to have Hostinger's team handle it on the backend.
You're running a WooCommerce store with active orders. Migrating an e-commerce site mid-transaction flow is risky. Hostinger's support can coordinate a migration window that doesn't interrupt your checkout process.
Your current host has locked you out. Some providers freeze your account when they sense you're leaving. If you can't access your files or database from the old host, Hostinger's team can often pull the site directly from a backup or work with you to gain access.
You're moving from a custom or obscure hosting platform. Hostinger's migrator plugin works with standard WordPress installations. If your site is on a proprietary CMS wrapper or a heavily custom server setup, a manual approach with support guidance is safer.
You've already tried migrating and something broke. Don't keep poking at a partially migrated site. Hostinger's support can assess what went wrong and finish the job without you making things worse.
To reach them, log into hPanel and click the chat icon in the bottom right. Support is available 24/7, and their WordPress-trained agents handle migration issues daily. Have your migration token, domain name, and old host login details ready before you start the conversation.
How Hostinger's Free Migration Stacks Up Against Paid Alternatives
Some hosting providers charge for migration. Others outsource it to a third party and pass the cost to you. Here's how Hostinger's free option compares to what you'd typically pay elsewhere.
| Migration Method | Cost | Best For | Turnaround |
|---|---|---|---|
| Hostinger WordPress Migrator plugin | Free | Most standard WordPress sites | Minutes to hours |
| Hostinger assisted migration (via support) | Free | Complex or large sites | 24 to 48 hours |
| All-in-One WP Migration (free version) | Free | Sites under 512 MB | Minutes to hours |
| Duplicator (free version) | Free | Sites where you want a local backup | Varies |
| Freelancer on Fiverr/Upwork | $20 to $100 | Users who want zero involvement | 1 to 7 days |
| Professional migration service | $100 to $300 | Enterprise or highly customized sites | 1 to 5 days |
| Paid migration plugins (e.g., UpdraftPlus Premium, BlogVault) | $49 to $99/year | Sites needing scheduled backups plus migration | Varies |
The bottom line: if you're moving to Hostinger, there's no reason to pay for a third-party migration service. The free plugin covers the vast majority of use cases, and Hostinger's own support team handles the edge cases at no extra charge.
The paid third-party services make sense only if you're not moving to a host that offers free migration, or if your site has custom server-level configurations that require a developer's attention. For a standard WordPress blog, portfolio, or small business site, Hostinger's built-in tools are more than sufficient.
Keeping Your Site Fast and Secure After Migration
Migration is just the first step. What you do in the first week on Hostinger determines whether your site actually performs better or just runs on different hardware.
Optimize for LiteSpeed
Hostinger runs LiteSpeed web servers on all WordPress plans. If you're not using a cache plugin that's compatible with LiteSpeed, you're leaving performance on the table. Install LiteSpeed Cache (LSCache) from the WordPress plugin repository.
It's free and it integrates directly with Hostinger's server-level caching.
After activating it, go to the plugin settings and enable page caching, browser caching, and CSS/JS minification. These three settings alone can shave a full second off your load time on most sites.
Enable Hostinger's Built-In Security Features
In hPanel, head to Security > WAF (Web Application Firewall) and make sure it's enabled. Hostinger uses a Cloudflare-powered WAF that blocks common WordPress attacks like SQL injection and cross-site scripting.
Also enable two-factor authentication on your Hostinger account. If someone gets into your hosting account, they can wipe your site. 2FA takes 30 seconds to set up and prevents the most common account takeover scenarios.
Set Up Automatic Backups
Hostinger includes weekly backups on the Single plan and daily backups on Premium and higher. Verify that backups are actually running by checking Files > Backups in hPanel. Download at least one backup manually so you know the system works.
For critical sites, consider a plugin like UpdraftPlus to store backups off-site (Google Drive, Dropbox, etc.). Don't rely solely on your host's backup system. If Hostinger has a storage failure and your only backups are on their server, you've got a problem.
Monitor Uptime and Performance
Install a monitoring service like Uptime Robot (free tier available) to ping your site every 5 minutes. If it goes down, you'll get an alert before most visitors notice.
For performance tracking, test your site's load time on the first day after migration, then again after a week of caching and optimization. Compare the numbers to your pre-migration benchmarks.
What to Do If Your Old Host Makes Migration Difficult
Some hosting providers don't make it easy to leave. They'll hide your backup tools, throttle your export speeds, or lock your account the moment they detect migration activity. Here's how to work around the most common roadblocks.
Your Host Won't Let You Export the Database
If phpMyAdmin is disabled or your host restricts database exports, try installing WP-DB-Backup from the WordPress plugin repository. It's a free plugin that lets you export your database directly from the WordPress admin dashboard, no server access required.
If even that's blocked, your last resort is a plugin like "WP All Export" which can dump your content into XML or CSV files. It's not as clean as a full database export, but it preserves your posts, pages, and metadata.
Your Host Has Disabled FTP Access
Without FTP, you can't download your wp-content folder. Check if your host offers a file manager in their control panel. Most cPanel-based hosts do.
You can compress the wp-content folder into a ZIP file and download it through the browser.
If the file manager is also restricted, use a plugin like "File Manager" from the WordPress repository. It adds a file browser inside your WordPress admin, letting you compress and download files without touching the server directly.
Your Host Suspended Your Account Early
Some hosts have a policy of suspending accounts shortly after a cancellation request. If this happens, contact their support immediately and request a temporary reinstatement for migration purposes. Be direct: you need 48 hours to move your data.
If they refuse, check if you have any local backups, cached versions through a service like the Wayback Machine, or a staging copy on your own computer. It's not ideal, but it's better than losing everything.
Your Site Uses a Custom Database Prefix
Most WordPress sites use the default wp_ database prefix. Some hosts or security plugins change this to something custom like wp7x_ or mysite_. If your migration plugin can't find the tables, check your wp-config.php file for the $table_prefix variable and make sure the migration tool is looking for the right prefix.
Migrating a Multisite Network to Hostinger
WordPress Multisite is a different animal. If you're running a network of sites under a single WordPress installation (like university department sites or a franchise network), the migration process has extra steps that a standard single-site migration doesn't cover.
Before You Start
Back up everything. Twice. Multisite databases are more complex because they share user tables and some options across all sites in the network.
A partial restore can break the entire network.
Document every subsite in your network. List the domain mappings, active plugins (both network-activated and per-site), and any custom code in wp-config.php or mu-plugins.
The Migration Process
The Hostinger WordPress Migrator plugin does not officially support Multisite networks as of 2026. You'll need to use the manual method.
Export each subsite individually using a plugin like "NS Cloner" which is built for Multisite. Then import each one as a separate WordPress installation on Hostinger, or use domain mapping to recreate the network structure.
Alternatively, export the entire Multisite database, do a search-and-replace for all old URLs (each subsite will have its own URL pattern), and import it into a fresh Multisite installation on Hostinger. This requires editing wp-config.php to enable Multisite and configuring the network settings from scratch.
After Migration
Test every subsite individually. Check that user roles and permissions carried over correctly. Multisite user tables are shared, so if the import didn't handle them properly, you might find that administrators on one subsite have access they shouldn't have on another.
Update your domain mapping plugin settings if you're using domain mapping. The old host's server IP and configuration won't match Hostinger's, so any hardcoded references need to be updated.
Handling Custom Code, Cron Jobs, and Server Configurations
Standard WordPress sites are straightforward to migrate. But if your site relies on custom server-level configurations, you'll need to recreate those on Hostinger after the migration.
Custom Cron Jobs
WordPress uses WP-Cron to schedule tasks like publishing scheduled posts, running backup plugins, and sending email notifications. If your old host had custom cron jobs set up at the server level (through cPanel or command line), those won't carry over automatically.
In Hostinger, you can set up cron jobs through hPanel under Advanced > Cron Jobs. Recreate any custom intervals your site needs. If you're not sure what cron jobs your old host had, check with their support or look for a plugin like "WP Crontrol" which lists all registered cron events in your WordPress admin.
Custom PHP Settings
If your old host had custom php.ini settings (like increased upload limits, memory limits, or execution time), you'll need to replicate those on Hostinger. In hPanel, go to PHP Configuration and adjust the following common values:
| Setting | Default | Recommended for Most Sites |
|---|---|---|
upload_max_filesize |
128M | 256M |
post_max_size |
128M | 256M |
memory_limit |
256M | 512M |
max_execution_time |
60 | 120 |
max_input_time |
60 | 120 |
If you need settings beyond what the hPanel interface allows, you can create a custom php.ini or .user.ini file in your site's root directory. Hostinger's knowledge base has the exact syntax.
Custom .htaccess Rules
If you had custom rewrite rules, redirects, or security headers in your .htaccess file on the old host, copy those over to Hostinger. The base WordPress .htaccess rules will be the same, but anything custom needs to be manually transferred.
One important difference: Hostinger runs LiteSpeed, not Apache. Most Apache .htaccess rules work on LiteSpeed, but there are exceptions. If you had mod_security rules or specific mod_rewrite flags, test them after migration and check Hostinger's documentation for LiteSpeed equivalents.
Long-Term Maintenance on Hostinger: What Changes After Migration
Your site is live on Hostinger. The migration is done. But running a WordPress site on a new host means adjusting your maintenance routine to match Hostinger's tools and limitations.
Backups Work Differently
Hostinger's built-in backup system is reliable, but it's not a replacement for your own backup strategy. Weekly backups on the Single plan mean you could lose up to a week of data if something goes wrong between backup cycles.
Set up a plugin like UpdraftPlus to run daily backups to an external destination. Google Drive gives you 15 GB for free, which is enough for most WordPress sites. Configure it to back up both files and database, and set a retention policy so you're not storing hundreds of old backups.
Plugin and Theme Updates Need More Attention
Hostinger's auto-update feature for WordPress core is enabled by default on most plans. That's good for security, but it can occasionally cause issues if a core update conflicts with an outdated plugin.
Before major updates, check your error logs and make sure your plugins are compatible with the latest WordPress version. If you're on the Business plan or higher, use the staging environment to test updates before pushing them live.
Resource Limits Are Real
Shared hosting means shared resources. Hostinger monitors CPU usage, memory consumption, and inode counts (the number of files on your account). If you exceed the limits for your plan, you'll get a warning, and in extreme cases, your site may be throttled.
Keep your site lean. Delete unused plugins and themes. Optimize your images before uploading them.
Run a database cleanup plugin periodically to remove post revisions, transients, and spam comments. These small habits keep you well within Hostinger's resource limits.
Scaling Up Is Easy
If your site outgrows your current plan, Hostinger makes it simple to upgrade. You can move from Single to Premium to Business to Cloud without migrating again. The upgrade happens on the same server infrastructure, so there's no downtime or data transfer involved.
Monitor your resource usage in hPanel under Statistics. If you're consistently hitting 70 percent or more of your plan's limits, it's time to upgrade before performance starts to suffer.
Frequently Asked Questions
Can I migrate my WordPress site to Hostinger without downtime?
Yes. Keep your old host active while the migration runs and DNS propagates. Use a maintenance mode plugin during the actual DNS switch.
Most visitors won't notice anything if you lower your TTL values 24 hours ahead of time.
Will my WordPress plugins work on Hostinger after migration?
In most cases, yes. Hostinger runs standard PHP and MySQL, which is what WordPress plugins expect. The main exception is if your old host was running an outdated PHP version and a plugin relies on deprecated functions.
Update all plugins before migrating to be safe.
Do I need to reinstall WordPress on Hostinger before migrating?
Only if you're using the All-in-One WP Migration manual method. The Hostinger WordPress Migrator plugin transfers everything, you don't need a fresh WordPress installation first.
What happens to my site during DNS propagation?
Some visitors will see your old site and some will see the new one. This is normal and resolves within 48 hours. Keep both hosting accounts active during this window so no one gets a broken page.
Can I migrate multiple WordPress sites to Hostinger for free?
Yes, as long as your Hostinger plan allows multiple websites. The Premium plan supports up to 100 sites. You'll need to run the migration process for each site individually.
Is Hostinger's free migration really free, or are there hidden costs?
It's genuinely free. You pay for the hosting plan, but the migration itself has no additional charge. There's no upsell, no premium tier required, and no bait-and-switch.
Every WordPress plan at Hostinger includes it.
Final Checklist: You're Live on Hostinger
Run through this checklist one last time before you consider the migration complete. Every item should be green.
- Full backup created and stored locally
- Site migrated and verified on Hostinger's temporary URL
- SSL certificate installed and active (HTTPS working)
- All pages, images, and links loading correctly
- Forms submitting and emails sending
- Permalinks saved (no 404 errors)
- Caches cleared (plugin, server, browser)
- DNS nameservers updated at your registrar
- Email accounts reconfigured on Hostinger
- Google Search Console updated with new sitemap
- 301 redirects set up (if URLs changed)
- Old hosting account still active (wait 72 hours)
- Error logs monitored for 48 hours
- Custom PHP settings replicated
- Cron jobs reconfigured
- Backup plugin set up for ongoing external backups
- LiteSpeed Cache installed and configured
Once every box is checked and your site has been stable for a few days, you can cancel your old hosting with confidence. You've moved your WordPress site to Hostinger for free, and you didn't break anything in the process.